Path of Exile 2: Mastering FilterBlade Usage
Author : Simon
Apr 16,2025
Quick Links
For anyone diving into the challenging world of Path of Exile 2's Endgame, selecting a suitable loot filter is not just a convenience—it's essential. Loot filters not only cut through on-screen clutter to make your mapping sessions more enjoyable, but they also enhance your gameplay by highlighting items of importance, freeing you from the mental task of sifting through irrelevant drops.
FilterBlade, widely acclaimed for its utility in Path of Exile 1, now extends its support to Path of Exile 2, making it easier than ever to tailor your gaming experience. Here’s how you can leverage this powerful tool.
How to Set Up FilterBlade Loot Filters in Path of Exile 2
- Begin by visiting the FilterBlade website.
- Choose PoE 2 when prompted.
- By default, the NeverSink loot filter will be selected.
- Adjust the Strictness level using the slider provided (more on this later).
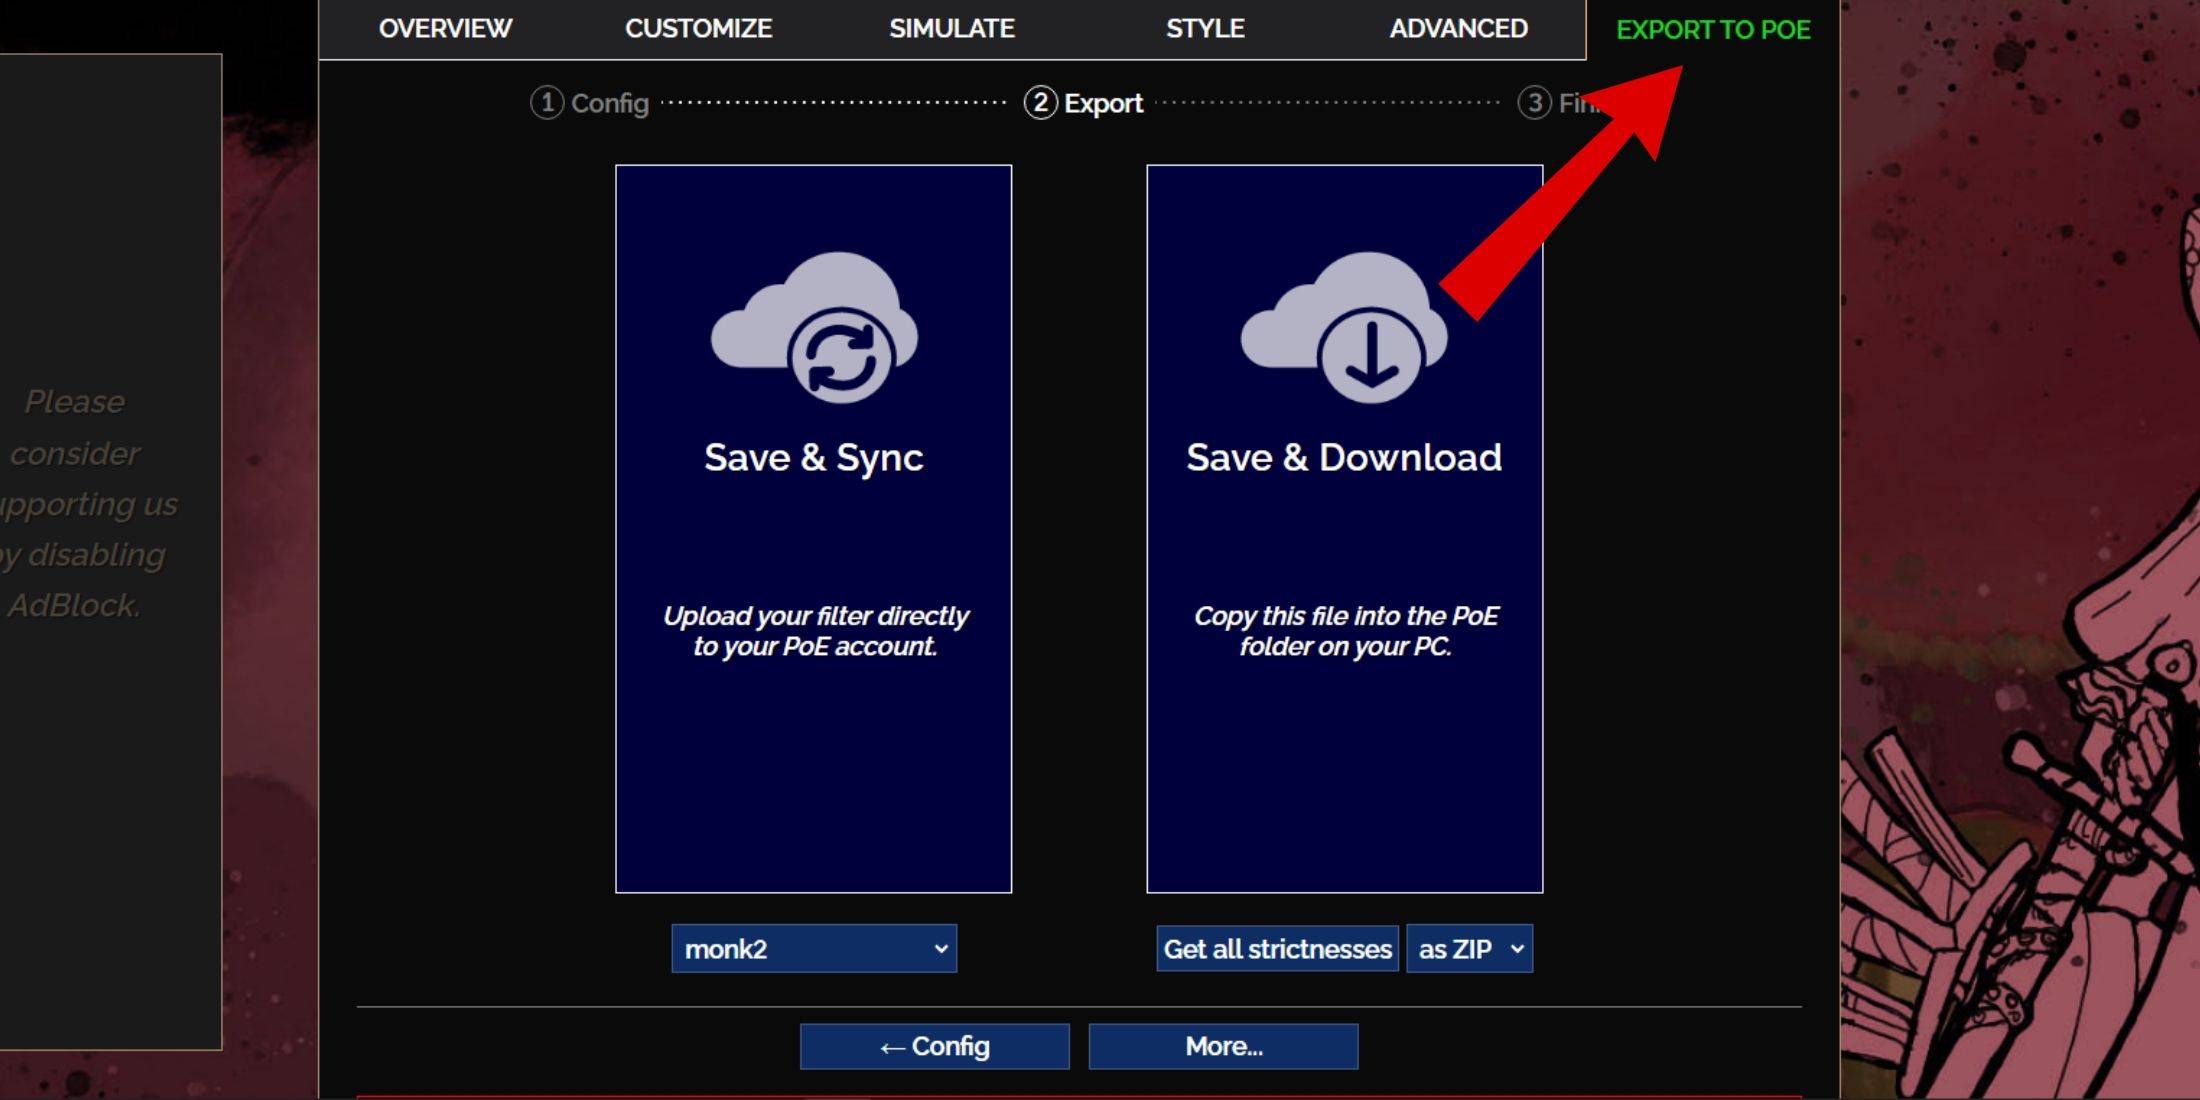
- Navigate to the Export to PoE tab in the top right corner.
- Enter a name for your filter; it can be any name you prefer.
- Decide between Sync or Download at the bottom right:
- Save & Sync will directly upload the FilterBlade loot filter to your PoE 2 account, ensuring automatic updates as the filter is modified by the author.
- Save & Download allows you to save the file on your PC, which is useful for comparing different Strictness levels or preparing for a new campaign without multiple syncs.
- Launch PoE 2 and head to Options -> Game.
- If you opted for Sync, select the newly added FilterBlade from the Item Filter dropdown.
- If you chose Download, click the folder icon next to the dropdown and select your downloaded filters.
And that's it! Your FilterBlade loot filter should now be seamlessly integrated into your game, enhancing your play experience. Which Loot Filter Strictness Should You Choose?
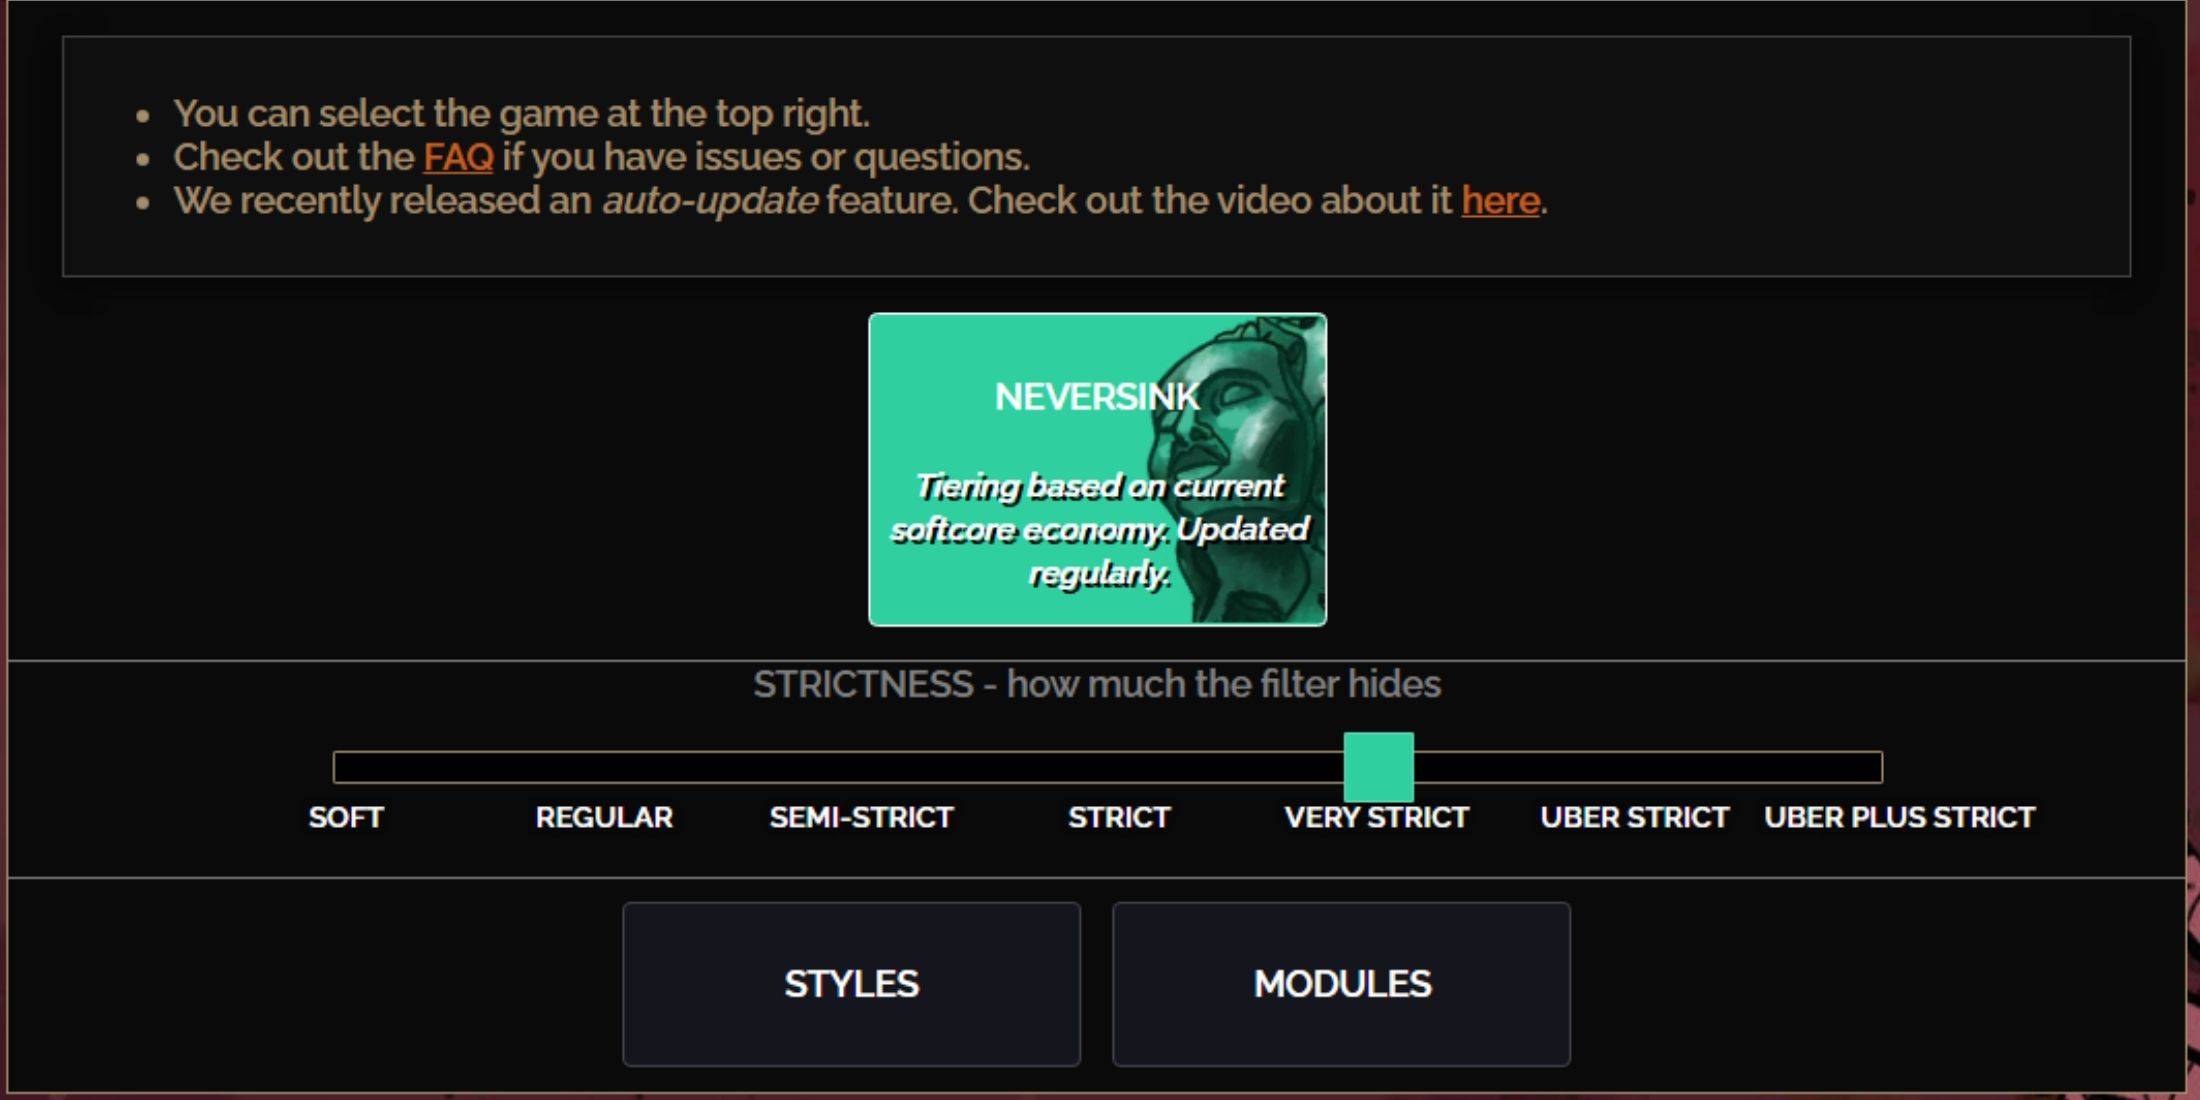
Choosing the right strictness level for your NeverSink FilterBlade preset is crucial, as it determines what items you'll see during gameplay. You can always fine-tune with exceptions, but starting with the right strictness level can prevent future headaches.
| Strictness | Effect | Best For |
|---|---|---|
| Soft | Highlights valuable materials and items; doesn't hide anything. | Act 1-2 |
| Regular | Hides only items with no crafting potential or sale value. | Act 3 |
| Semi-Strict | Hides items with low potential or limited value. | Act 4-6 |
| Strict | Hides most items without high turnover. | Early Mapping phase (Waystone Tier 1-6) |
| Very Strict | Hides low-value rare items and crafting bases; hides Waystone Tier 1-6. | Mid to late mapping phase (Waystone Tier 7+) |
| Uber Strict | Hides almost all non-tiered rare items and crafting bases; focuses on complete currency like Regal/Alchemy/Exalted/Chaos Orbs; hides Waystones Tier 1-13. | Late mapping phase (Waystone Tier 14+) |
| Uber Plus Strict | Hides nearly everything except valuable currencies and high return rares and uniques; hides Waystones Tiers 1-14. | Ultra endgame mapping phase (Waystone Tier 15-18) |
For players embarking on a second or third campaign, starting with the Semi-Strict level is advisable. Soft and Regular Strictness levels are more suitable for fresh league runs, where every item counts for character progression, similar to an SSF (Solo Self-Found) scenario.
Remember, items hidden by your loot filter can be temporarily viewed by pressing the highlight key (ALT on PC). FilterBlade offers a unique feature where pressing ALT with a stricter filter setting reduces the size of item names, effectively making them disappear from your view, which is particularly useful for streamlined item pickup in PoE 2.
How to Customize FilterBlade Loot Filter in PoE 2
FilterBlade excels in its ability to modify preset loot filters effortlessly, without the need to navigate complex code lines. Its customization options are vast and user-friendly.
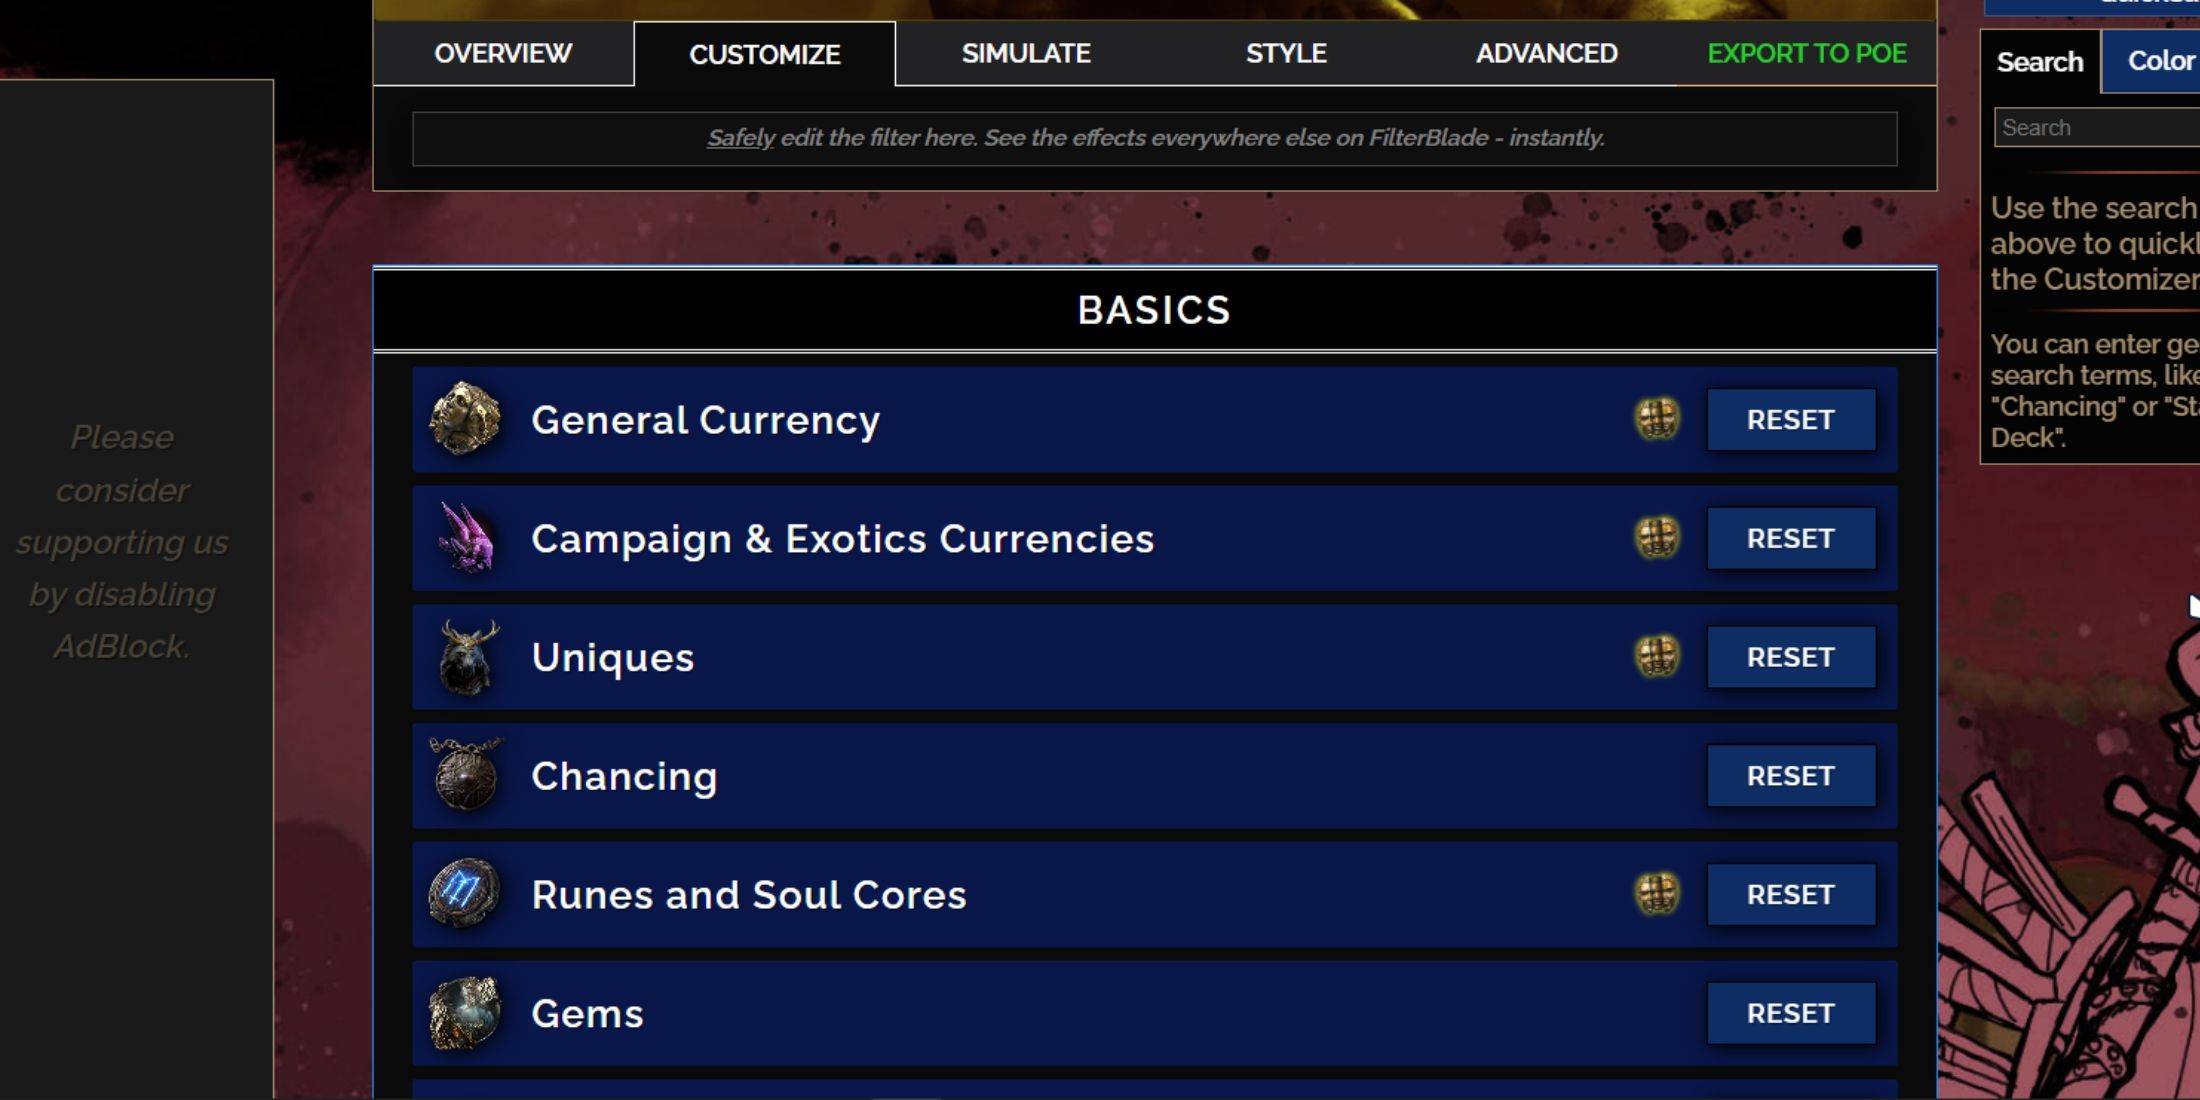
How to Use the Customize Tab in FilterBlade
To dive deeper into customization, go to the 'Customize' tab next to Overview. Here, you'll encounter a comprehensive breakdown of all possible drops in PoE 2, organized into sections and subsections for detailed adjustments.
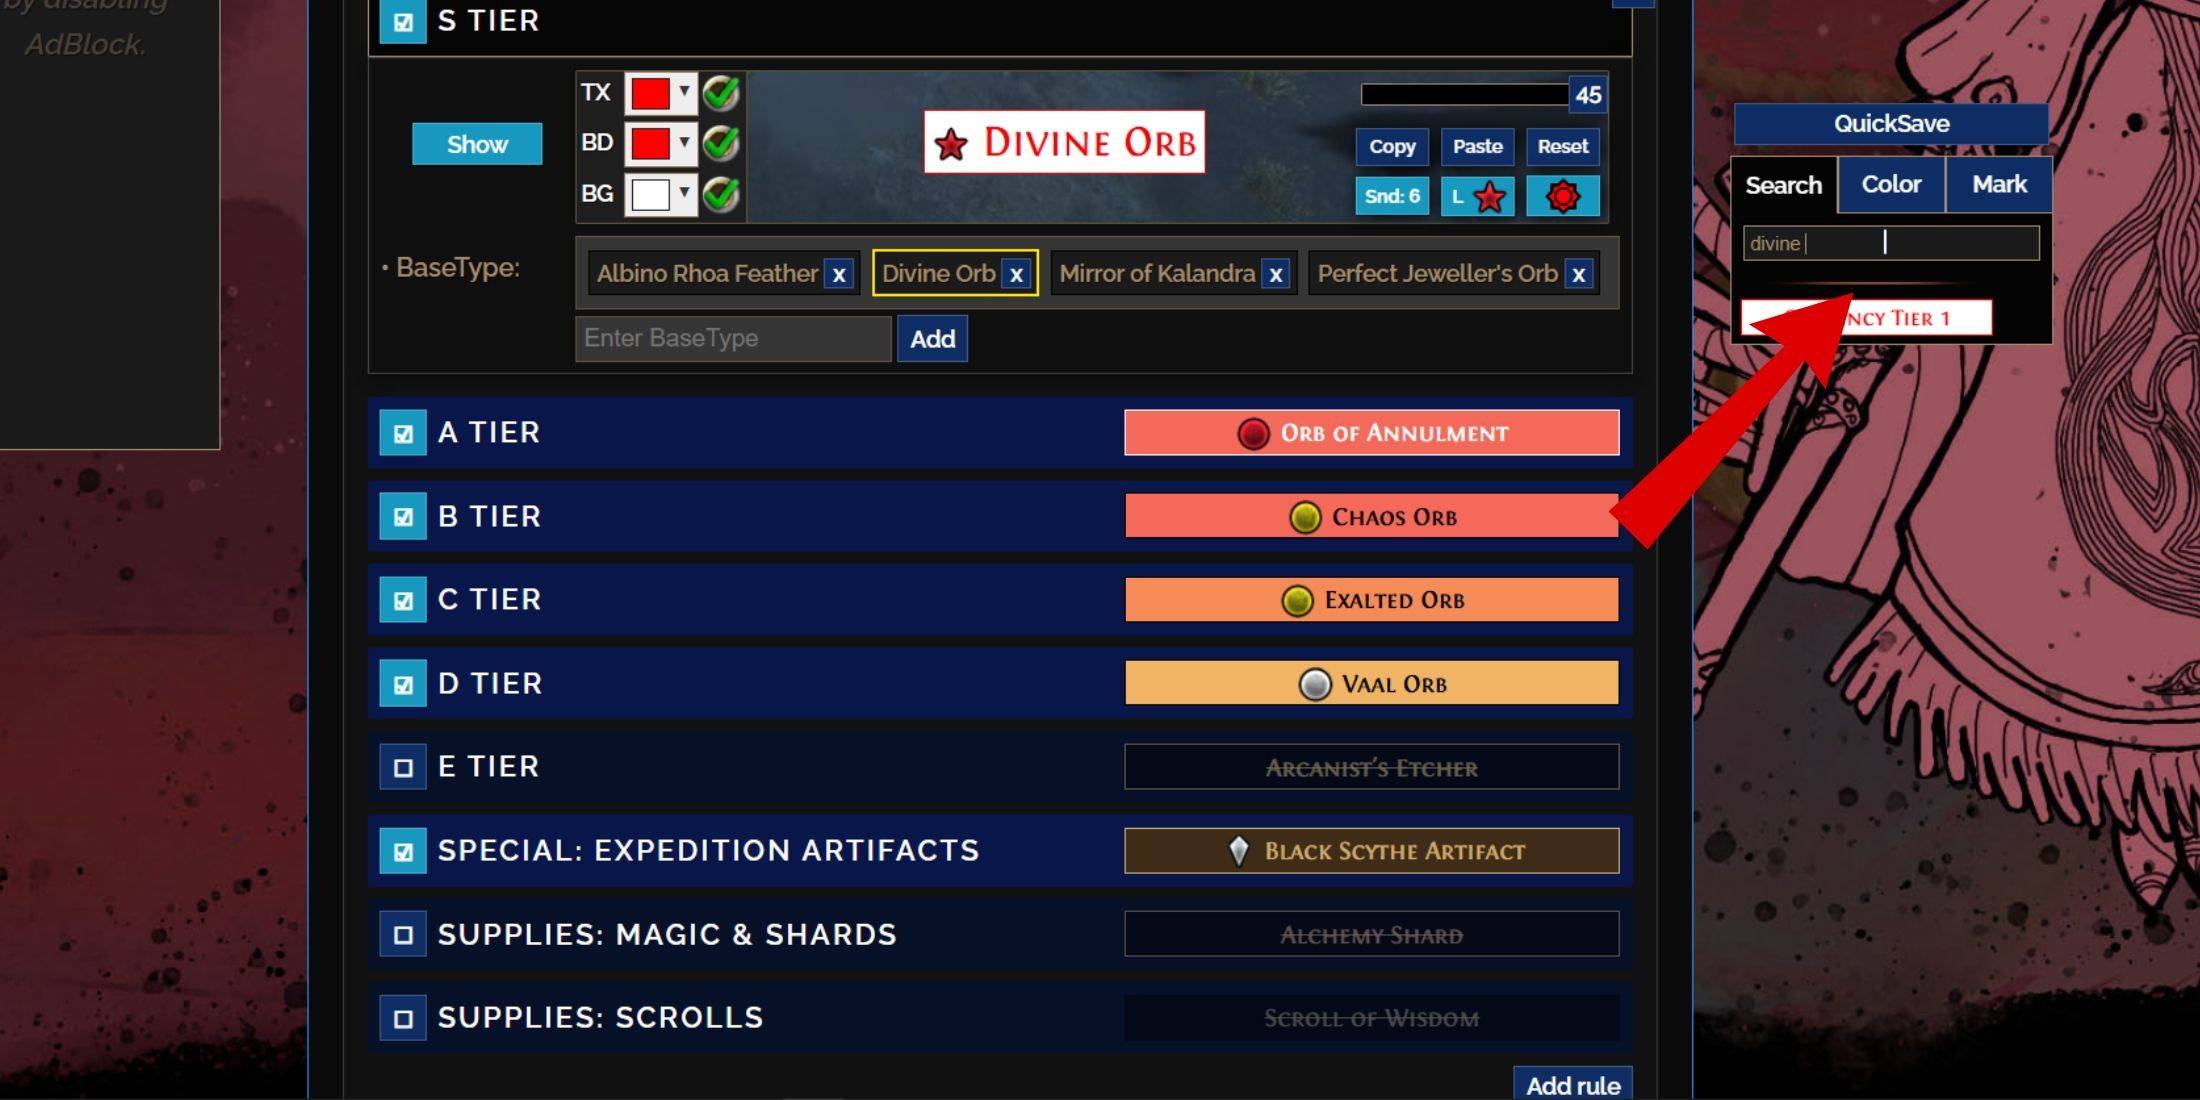
For instance, to alter the appearance of a  Divine Orb when it drops, simply enter "Divine Orb" into the search bar on the right. This will direct you to the S Tier General Currency tab, where you can tweak its visual settings, with immediate previews available.
To preview the sound of an item drop, click the in-game showcase icon.
How to Change Colors and Sounds in FilterBlade
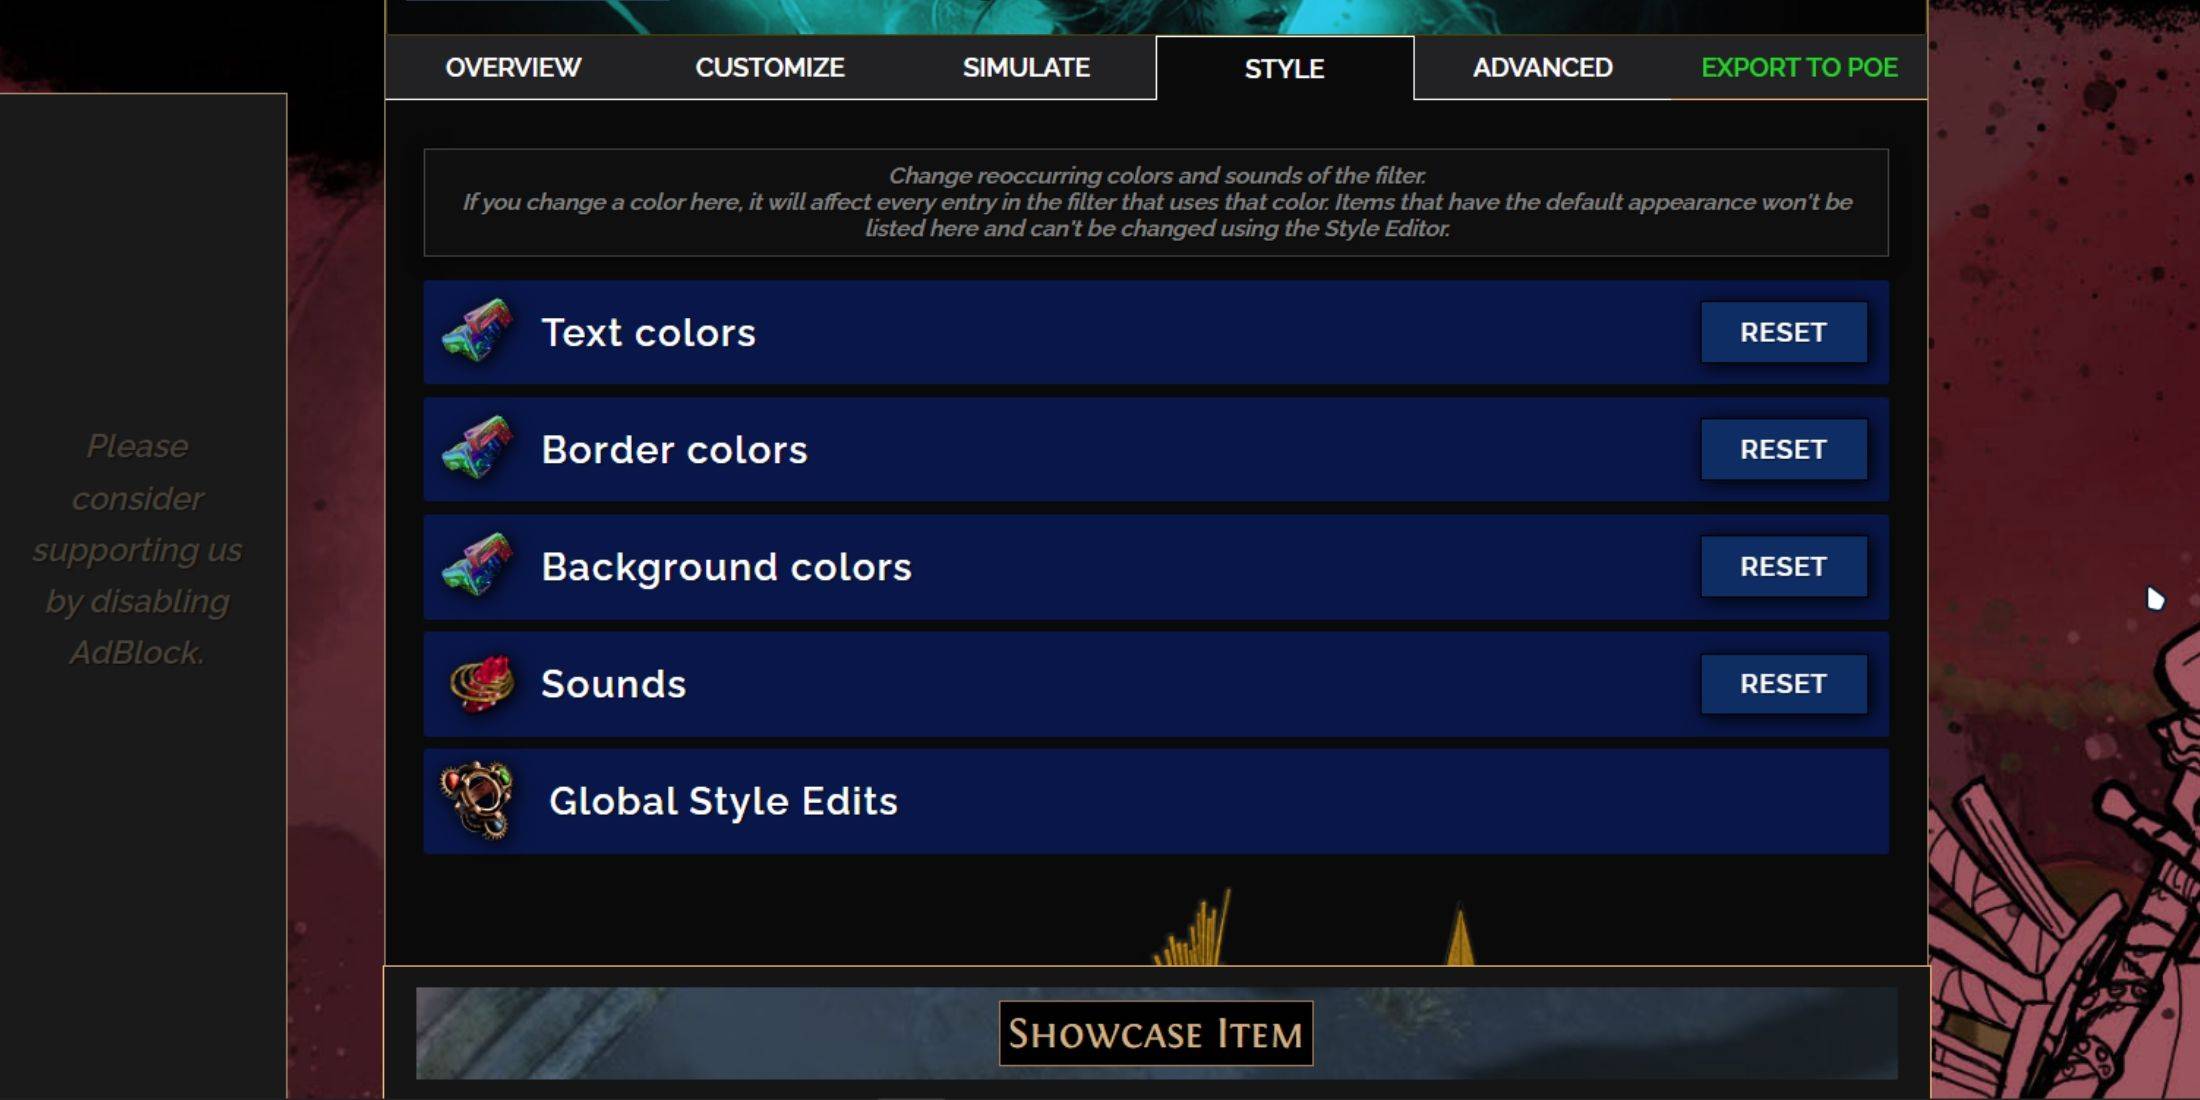
For individual or small group item changes, use the 'Customize' tab. For broader, filter-wide modifications, the 'Styles' tab is your go-to spot. Here, you can adjust the Text, Border, and Background of dropped items, as well as their associated audio cues.
Color adjustments are straightforward, with visual previews to help you see the in-game effect. For specific item changes, head back to the 'Customize' tab.
For sound effects, use the drop-down menu to select from 'Custom' options, where you can upload your own .mp3 files, or 'Game & Community Sounds', which offers an extensive library. Experimentation is encouraged, with the option to revert changes by selecting 'Reset'.
If you're new to loot filter customization, exploring public Modules can be a great starting point. These community-crafted presets offer visual and auditory tweaks to enhance your gameplay experience.
Latest Articles
Hand-Drawn Photography Adventure Game TOEM Opens Pre-Registration on Mobile
BAFTA-winning title TOEM: A Photo Adventure arrives on mobile devices worldwide.
Developed by Swedish indie studio Something We Made, pre-registration for TOEM is now available on Android. The official release date is set for October 22nd.
Fun fact:

Mutants: Genesis Hits iOS, Android, Steam After Early Access
Clash Royale players finally get to witness the highly anticipated evolution of the Inferno Dragon. After nearly a decade without an upgrade, this fiery Legendary card receives a powerful transformation. The developers at Supercell teamed up with Fin

Pokemon GO Road Trip 2025 Details, Summer Pikachu Available
Experience Pokémon GO Road Trip Truck stops in the gameFind Wooloo, Phanpy, and Alolan Geodude in the wildSummer-style Pikachu makes a special appearanceIf today's new details don't get you excited for the Pokemon GO Road Trip 2025, nothing will. Thi
PlayStation Stars Shuts Down After 3 Years
Sony has announced the discontinuation of its PlayStation Stars loyalty program less than three years after its introduction.The rewards initiative stopped accepting new members today, with exiting participants unable to rejoin. Canceling membership
Mastering Cooking in Ragnarok X: Next Generation
Cooking in Ragnarok X: Next Generation is a dynamic system that enhances combat, resource gathering, and character progression. Preparing dishes grants temporary boosts, improving dungeon survivabilit

Poppy Playtime Chapter 4 Launches with Introductory Sale
Uncover new characters and a deeper backstoryNavigate the depths of the Playtime Co. factoryLimited-time introductory discount availableMob Entertainment has officially released Poppy Playtime Chapter 4, allowing you to dive into the next chilling ch
Latest Games

Jam Bonanza
Board丨102.0 MB
CELLS - Tile Matching Games
Board丨189.5 MB


Street Art-Color by number
Board丨54.2 MB
Art Coloring
Board丨25.9 MB

Cartas do Caos
Card丨21.1 MB

Klaverjassen - Rotterdams
Card丨9.2 MB


Top News
MORE +

01
01-07
BREAKING: Flight Simulator 2024 Login Woes Ground Players
Flight Simulator 2024 Launch Plagued by Technical Difficulties
The highly anticipated launch of Flight Simulator 2024 has been significantly hampered by widespread technical problems, leaving many players grounded before they could even take to the virtual skies. This article details the reported d
02
01-06
CDPR acknowledged weak gameplay in The Witcher 3
The Witcher 3, while critically acclaimed, wasn't without its flaws. Many fans felt the combat system fell short.
In a recent interview, Witcher 4's game director, Sebastian Kalemba, acknowledged weaknesses in the previous game's gameplay, specifically highlighting the need for significant improvem
03
11-17
Hogwarts Legacy 2 is "One of the Biggest Priorities" for WB Games
Following the successful launch of Quidditch Champions this week, Warner Bros. Discovery has confirmed its plans for a sequel to last year's Harry Potter-based action RPG hit Hogwarts Legacy—2023's best-selling game.Hogwarts Legacy Sequel Plans Confirmed by Warner Bros. DiscoveryExpected in
04
11-16
Airplane Chefs Brings The Ultimate Snack, Pringles, On Board!
Buckle up for some snacks as Nordcurrent has just dropped an exciting event for their cooking game. It’s the most unexpected collab of Airplane Chefs and Pringles. If you’ve been enjoying your virtual life as a flight attendant, things are about to get a lot tastier.The game developer behind p
05
11-16
Play Together to collaborate with Sanrio and introduce new My Melody and Kuromi content
Play Together is bringing back its Sanrio collab with the appearance of My Melody and KuromiYou can collect coins by completing their themed missions that can then be used to draw exclusive itemsAs a bonus there's also new summer-themed content and events, including a major bug huntPlay Together, th
Topics
More +