Guide: Preserve In-Game Progress During Mod Removal
Author : Joseph
Feb 22,2025
Removing Mods from Ready or Not: A Comprehensive Guide
Ready or Not's modding community offers exciting enhancements, but mods can sometimes lead to instability and prevent multiplayer with unmodded friends. This guide details how to completely remove all mods from your game.
Methods for Mod Removal
Regardless of your mod installation method (Nexus Mod Manager, mod.io, or manual), these steps ensure complete removal:
-
Unsubscribe In-Game: Launch Ready or Not. In the in-game Mod Menu, unsubscribe from all active mods. This prevents re-downloads after deletion. Close the game.
-
Delete Game Files: Open Steam, right-click Ready or Not in your Library, select Properties, then Installed Files, and Browse. Navigate to Ready Or Not > Content > Paks. Delete all files and folders within the Paks folder. Then, delete the Paks folder itself.
-
Delete Local AppData Files: Press Windows+R, type
%localappdata%, and press Enter. Locate the Ready or Not folder, and delete the Paks folder within it (Ready Or Not > Saved > Paks). -
Verify Game Files: Right-click Ready or Not in Steam, go to Properties > Installed Files > Verify Integrity of Game Files. This ensures no corrupted files remain.
-
Optional Reinstall: For a completely clean slate (recommended if you're not planning to use mods again), consider reinstalling Ready or Not.

Why Delete Mods?
While mods enrich Ready or Not, they can also introduce errors, bugs, and glitches. A clean mod slate often resolves these issues. Furthermore, mods prevent multiplayer with friends who don't have the same mods installed. Deleting mods ensures compatibility and a smoother multiplayer experience.
Ready or Not is available now on PC.
Latest Articles
Konami Livestream: Metal Gear Solid Delta, Silent Hill f Details Revealed This Week
Play I'm particularly hopeful that Konami’s mention of "and more" will include No Code’s Silent Hill Townfall. It’s been years since we’ve received meaningful updates, and I’m eager to learn more. I’m also still waiting for news on future remakes or
Black Ops 7 Rating Hints at Premium Content Continuation
Call of Duty fans think they've found evidence suggesting that Call of Duty: Black Ops 7 will let players transfer their cosmetic skins from Black Ops 6.The ESRB rating has confirmed Black Ops 7 will be rated M for Mature 17+ and release on PC, PS5,

My Little Pomodoro Boosts Focus, Hits Android
Most productivity timers demand your focus. Devfloor's new release, My Little Pomodoro: Focus, actually gives something in return. This charming Android app transforms concentration into a rewarding experience rather than a tedious obligation.Underst
Tekken 8 Director Slams Fan Over Anna Williams' New Look: 'Unconstructive and Pointless'
Play
Tekken 8 veteran Anna Williams is making her return to the roster, and while her redesigned look has been well received by the majority of fans, it has also sparked some debate—particularly over comparisons of her new outfit to Santa Claus.
When a fan asked Tekken game director and chief prod
Ready or Not Shares Update in Censorship and Review-Bomb Fight
VOID Interactive has responded to player criticism following updates to the PC version of its controversial shooter Ready or Not, implemented to secure its console release. The studio clarified there have been "misconceptions and misinformation" rega
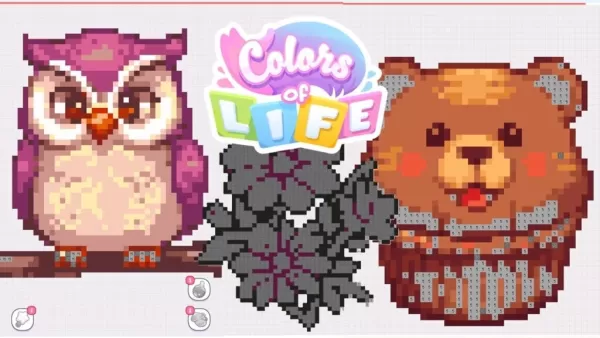
Colors of Life: 365 New Mobile Puzzles Annually
Colors of Life is an Android game that offers a fresh take on coloring. As the name suggests, you fill in colors, combining classic color-by-number mechanics with pixel art style. Developed by Rursus, it’s free to play with optional extras available
Latest Games


Game Vault:Slots Game
Card丨46.10M

Just Dance Now
Music丨127.48MB

Boarding School
Casual丨190.30M
Motorbike Rush Drive Simulator
Racing丨88.3 MB


Project Pentjet
Music丨6.51MB

3D World - Puzzle game
Educational丨63.75MB


Top News
MORE +

01
01-07
BREAKING: Flight Simulator 2024 Login Woes Ground Players
Flight Simulator 2024 Launch Plagued by Technical Difficulties
The highly anticipated launch of Flight Simulator 2024 has been significantly hampered by widespread technical problems, leaving many players grounded before they could even take to the virtual skies. This article details the reported d
02
01-06
CDPR acknowledged weak gameplay in The Witcher 3
The Witcher 3, while critically acclaimed, wasn't without its flaws. Many fans felt the combat system fell short.
In a recent interview, Witcher 4's game director, Sebastian Kalemba, acknowledged weaknesses in the previous game's gameplay, specifically highlighting the need for significant improvem
03
11-17
Hogwarts Legacy 2 is "One of the Biggest Priorities" for WB Games
Following the successful launch of Quidditch Champions this week, Warner Bros. Discovery has confirmed its plans for a sequel to last year's Harry Potter-based action RPG hit Hogwarts Legacy—2023's best-selling game.Hogwarts Legacy Sequel Plans Confirmed by Warner Bros. DiscoveryExpected in
04
11-16
Airplane Chefs Brings The Ultimate Snack, Pringles, On Board!
Buckle up for some snacks as Nordcurrent has just dropped an exciting event for their cooking game. It’s the most unexpected collab of Airplane Chefs and Pringles. If you’ve been enjoying your virtual life as a flight attendant, things are about to get a lot tastier.The game developer behind p
05
11-16
Play Together to collaborate with Sanrio and introduce new My Melody and Kuromi content
Play Together is bringing back its Sanrio collab with the appearance of My Melody and KuromiYou can collect coins by completing their themed missions that can then be used to draw exclusive itemsAs a bonus there's also new summer-themed content and events, including a major bug huntPlay Together, th
Topics
More +